<?xml version="1.0" encoding="utf-8"?><feed xmlns="http://www.w3.org/2005/Atom" ><generator uri="https://jekyllrb.com/" version="3.10.0">Jekyll</generator><link href="https://ravnhq.github.io/ai-toolkit/feed.xml" rel="self" type="application/atom+xml" /><link href="https://ravnhq.github.io/ai-toolkit/" rel="alternate" type="text/html" /><updated>2026-04-02T23:11:19+00:00</updated><id>https://ravnhq.github.io/ai-toolkit/feed.xml</id><title type="html">Ravn AI Toolkit</title><subtitle>Modular AI skills for LLM-assisted development</subtitle><entry><title type="html">Keep Your Context Window Clean</title><link href="https://ravnhq.github.io/ai-toolkit/blog/keep-your-context-window-clean/" rel="alternate" type="text/html" title="Keep Your Context Window Clean" /><published>2026-03-23T00:00:00+00:00</published><updated>2026-03-23T00:00:00+00:00</updated><id>https://ravnhq.github.io/ai-toolkit/blog/keep-your-context-window-clean</id><content type="html" xml:base="https://ravnhq.github.io/ai-toolkit/blog/keep-your-context-window-clean/"><![CDATA[<p>Tokens cost money and eat up your usage limits. But there’s a second tax that’s harder to notice: as the context window fills up, Claude gets worse. It forgets instructions, repeats itself, loses track of what it was doing mid-task. I’ve watched it happen enough times that I started obsessing over keeping context clean.</p>

<p>Here’s everything I wish I’d found earlier.</p>

<hr />

<h2 id="settings-you-should-change-today">Settings you should change today</h2>

<p>The defaults are conservative. Drop this into <code class="language-plaintext highlighter-rouge">~/.claude/settings.json</code>:</p>

<div class="language-json highlighter-rouge"><div class="highlight"><pre class="highlight"><code><span class="p">{</span><span class="w">
  </span><span class="nl">"model"</span><span class="p">:</span><span class="w"> </span><span class="s2">"opusplan"</span><span class="p">,</span><span class="w">
  </span><span class="nl">"env"</span><span class="p">:</span><span class="w"> </span><span class="p">{</span><span class="w">
    </span><span class="nl">"MAX_THINKING_TOKENS"</span><span class="p">:</span><span class="w"> </span><span class="s2">"16000"</span><span class="p">,</span><span class="w">
    </span><span class="nl">"CLAUDE_AUTOCOMPACT_PCT_OVERRIDE"</span><span class="p">:</span><span class="w"> </span><span class="s2">"65"</span><span class="p">,</span><span class="w">
    </span><span class="nl">"CLAUDE_CODE_SUBAGENT_MODEL"</span><span class="p">:</span><span class="w"> </span><span class="s2">"haiku"</span><span class="w">
  </span><span class="p">},</span><span class="w">
  </span><span class="nl">"defaultMode"</span><span class="p">:</span><span class="w"> </span><span class="s2">"plan"</span><span class="w">
</span><span class="p">}</span><span class="w">
</span></code></pre></div></div>

<p>Quick rundown:</p>

<p><strong><code class="language-plaintext highlighter-rouge">opusplan</code></strong> gives you Opus for planning and Sonnet for execution. Reasoning quality stays high where it matters, and the actual file edits happen on a cheaper model.</p>

<p><strong><code class="language-plaintext highlighter-rouge">MAX_THINKING_TOKENS</code></strong> defaults to 31,999. That’s a lot of internal monologue. I dropped it to 16,000 and haven’t noticed a quality difference for normal work. If you need deeper reasoning, bump it back up. Tweak to taste.</p>

<p><strong><code class="language-plaintext highlighter-rouge">CLAUDE_AUTOCOMPACT_PCT_OVERRIDE</code></strong> — most people don’t touch this. By default, Claude waits until the context is 95% full before compacting. By that point, quality has already degraded. I set mine to 65%. Sessions stay noticeably sharper. Compaction kicks in earlier than the default, so find the number that works for you.</p>

<p><strong><code class="language-plaintext highlighter-rouge">CLAUDE_CODE_SUBAGENT_MODEL</code></strong> defaults to whatever your main model is. Subagents don’t need Opus — they’re reading files, running grep, executing tests. Haiku handles that fine.</p>

<p><strong><code class="language-plaintext highlighter-rouge">defaultMode</code></strong> starts Claude Code in plan mode every time. I’ve used this for a while and don’t miss the default.</p>

<h2 id="compression-proxies">Compression proxies</h2>

<p>Two tools that compress shell output before Claude sees it.</p>

<p><a href="https://github.com/rtk-ai/rtk">RTK</a> intercepts common commands (<code class="language-plaintext highlighter-rouge">ls</code>, <code class="language-plaintext highlighter-rouge">cat</code>, <code class="language-plaintext highlighter-rouge">git log</code>, <code class="language-plaintext highlighter-rouge">git diff</code>, <code class="language-plaintext highlighter-rouge">npm</code>, and others) and compresses their output before it reaches Claude. Setup is two commands:</p>

<div class="language-bash highlighter-rouge"><div class="highlight"><pre class="highlight"><code>brew <span class="nb">install </span>rtk
rtk init <span class="nt">-g</span> <span class="nt">--hook-only</span>
</code></pre></div></div>

<p>I’ve been running it for a few weeks. Here’s what the savings look like:</p>

<p><img src="/ai-toolkit/assets/images/posts/rtk-savings.png" alt="RTK savings dashboard showing 91.3% token efficiency across 9,322 commands" /></p>

<p>
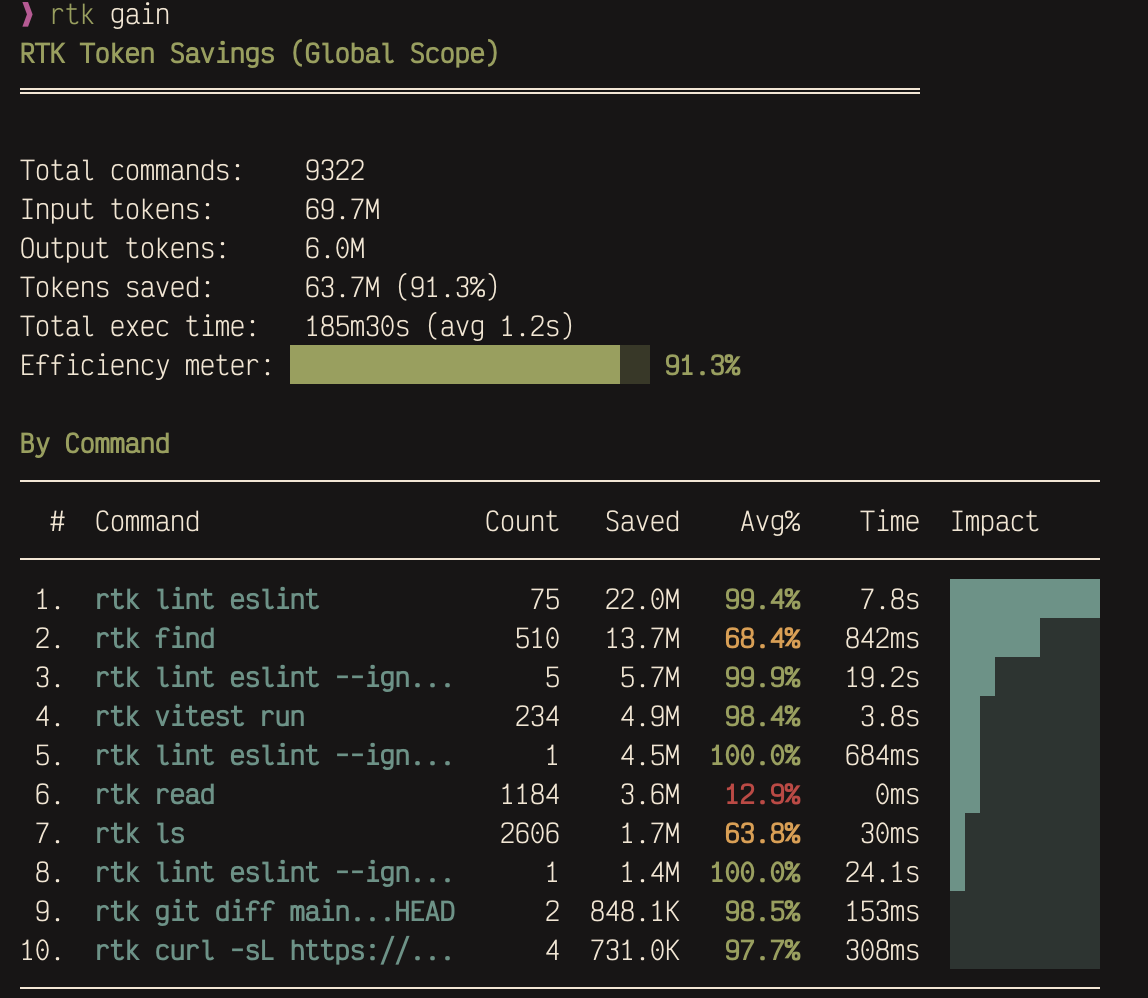
Over 9,000 commands intercepted, 63.7M tokens saved. The biggest wins come from lint output and file listings — stuff that’s repetitive and compresses well.
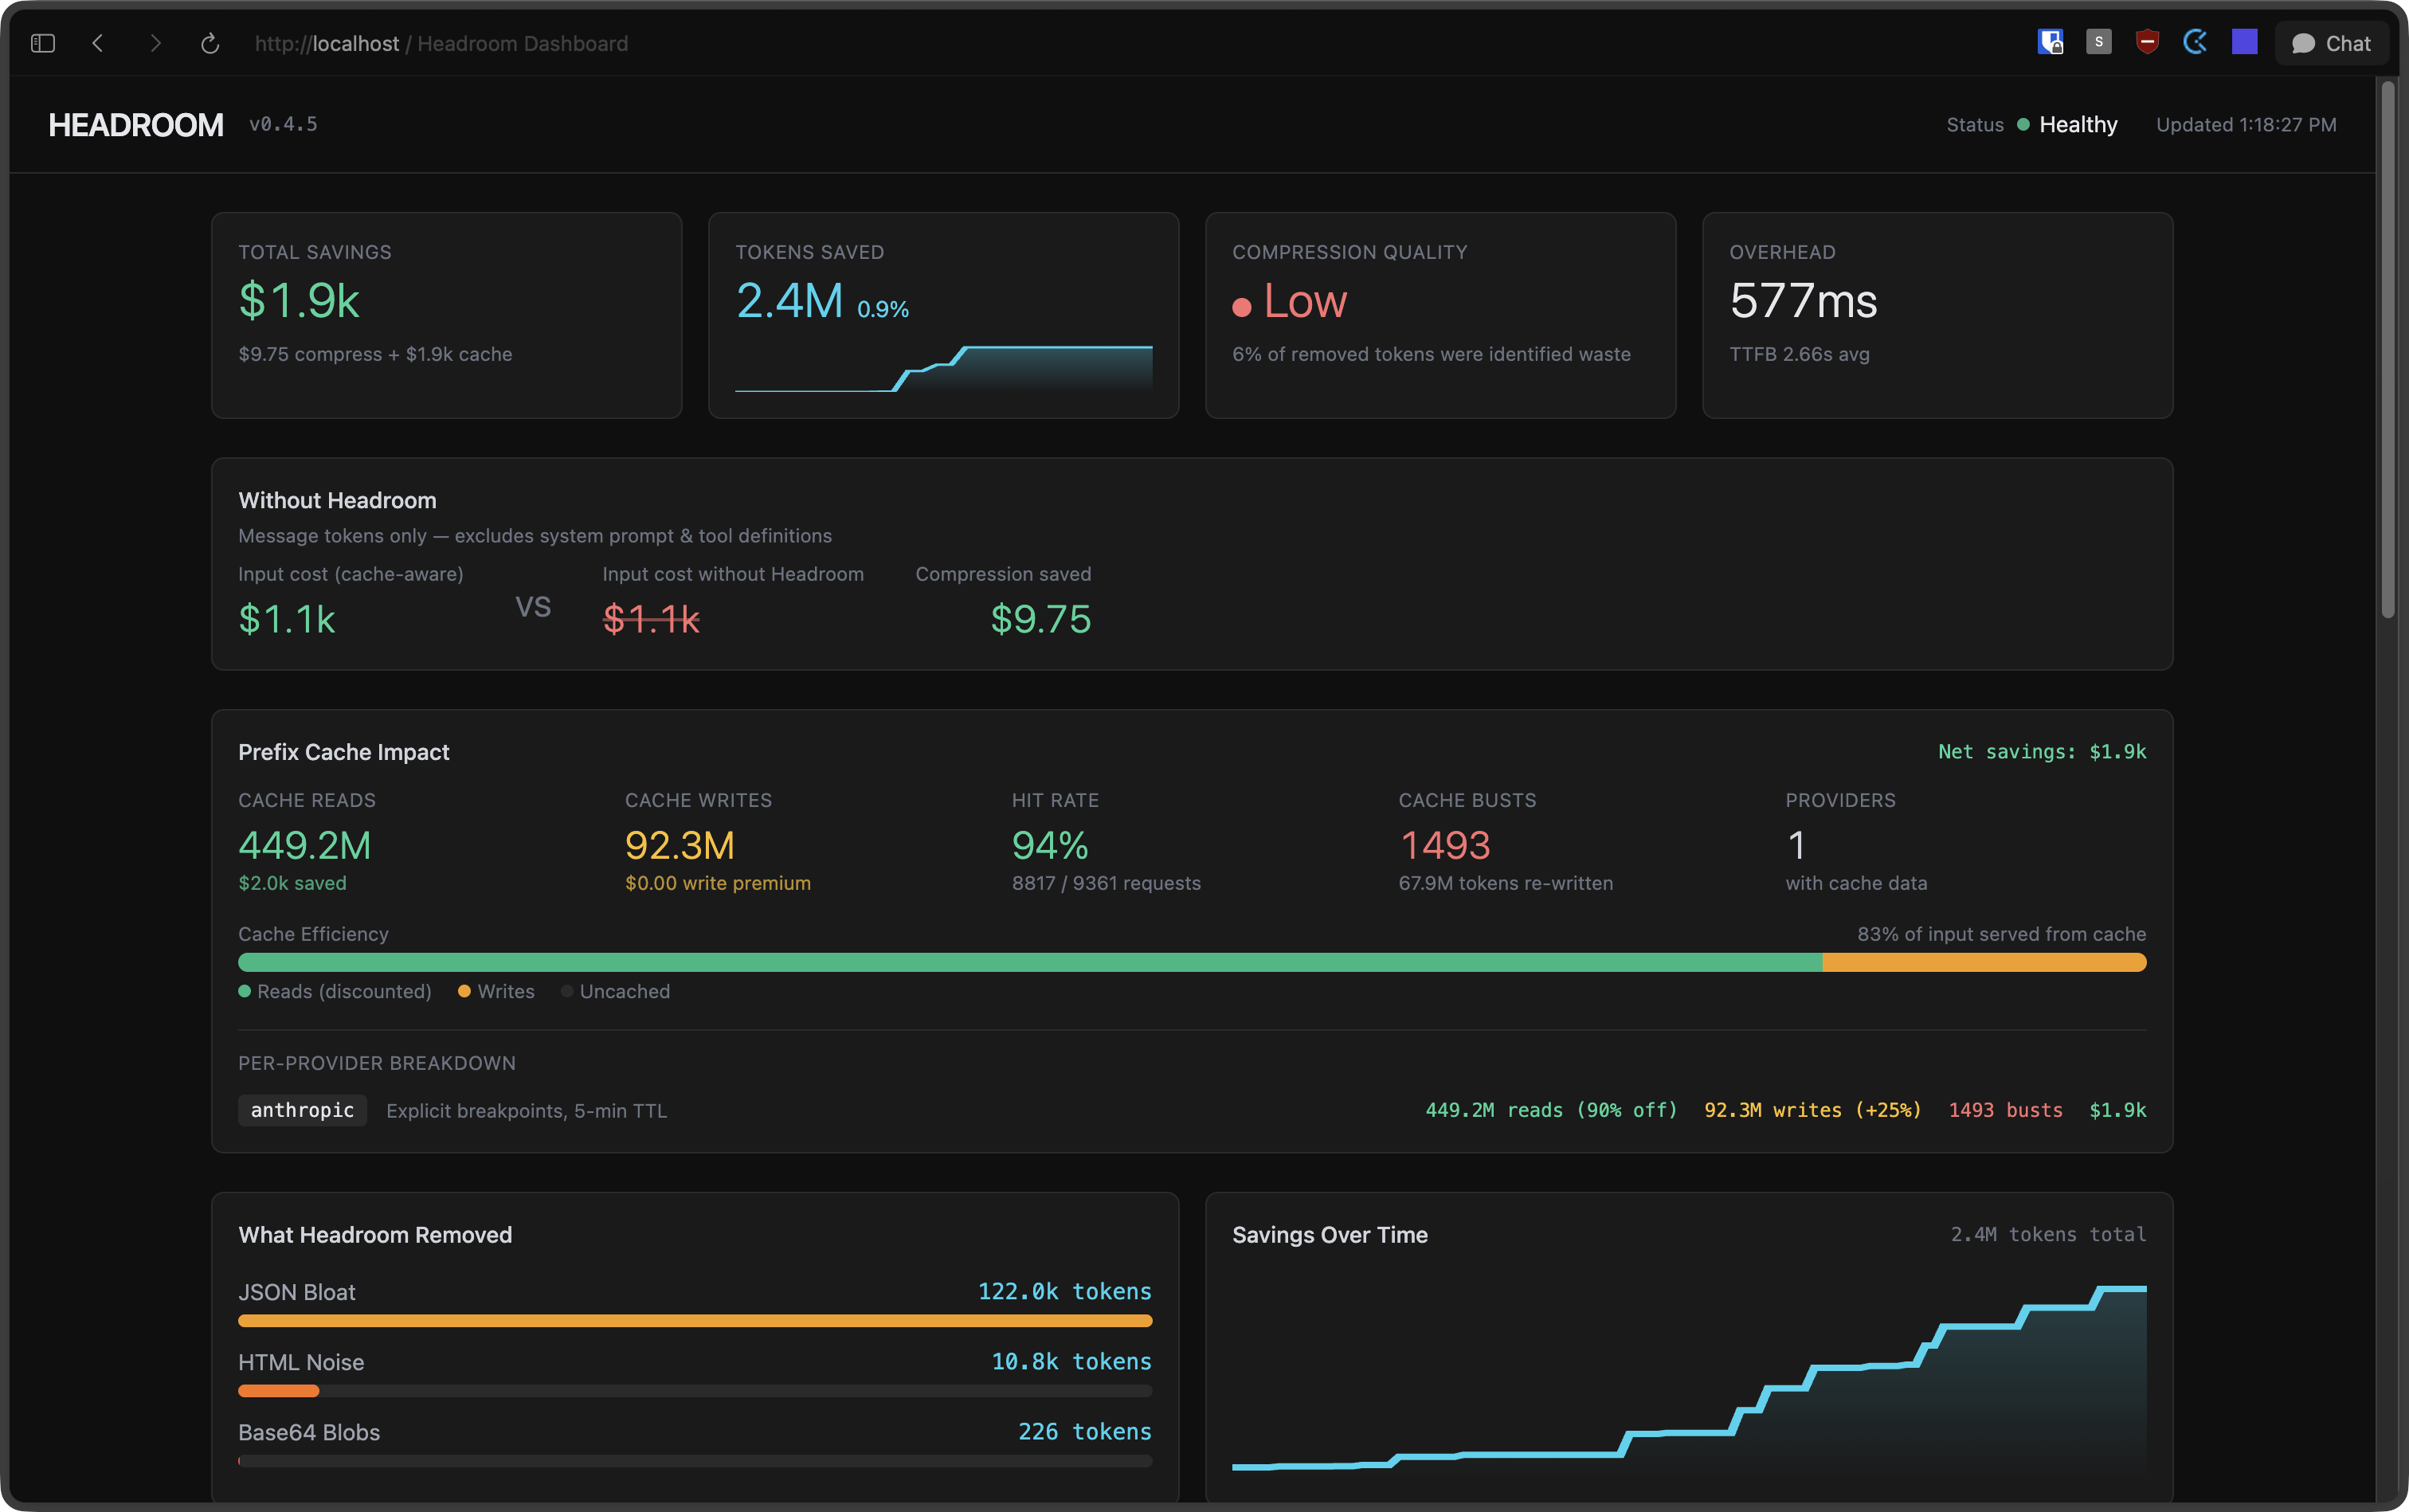
</p>

<p><a href="https://github.com/chopratejas/headroom">Headroom</a> goes after a different layer. It sits between you and Claude as a context compression proxy, squeezing down boilerplate in tool outputs, database results, logs, and conversation history. You can use both together.</p>

<div class="language-bash highlighter-rouge"><div class="highlight"><pre class="highlight"><code>pip <span class="nb">install</span> <span class="s2">"headroom-ai[all]"</span>
headroom wrap claude
</code></pre></div></div>

<p>The dashboard at <code class="language-plaintext highlighter-rouge">http://localhost:8787/dashboard</code> shows compression stats in real time:</p>

<p><img src="/ai-toolkit/assets/images/posts/headroom-dashboard.png" alt="Headroom dashboard showing $1.9k total savings and 2.4M tokens saved" /></p>

<h2 id="subagents">Subagents</h2>

<p>When Claude searches files or runs tests in your main session, all that output lands in your context window. Hundreds of lines of grep results, full file dumps, stack traces from failing tests. It adds up fast.</p>

<p>Subagents run in their own context. They do their work and return a compact summary. The noise stays in their window, not yours. I started using these late and the difference was immediate.</p>

<p>You define them as markdown files under <code class="language-plaintext highlighter-rouge">~/.claude/agents/</code> (global) or <code class="language-plaintext highlighter-rouge">.claude/agents/</code> (per-project). Here are four I keep around:</p>

<details>
  <summary><strong>researcher.md</strong> — looks things up without polluting my context</summary>

  <div class="language-markdown highlighter-rouge"><div class="highlight"><pre class="highlight"><code><span class="nn">---</span>
<span class="na">name</span><span class="pi">:</span> <span class="s">researcher</span>
<span class="na">description</span><span class="pi">:</span> <span class="s">Research agent for gathering information from the web, documentation, and codebases.</span>
<span class="na">model</span><span class="pi">:</span> <span class="s">haiku</span>
<span class="na">tools</span><span class="pi">:</span> <span class="s">Read, Grep, Glob, WebFetch, WebSearch</span>
<span class="nn">---</span>

workflow:
  1: most authoritative source first (official docs &gt; SO &gt; blogs)
  2: cross-reference when findings conflict
  3: include version numbers and dates

output:
  Answer: direct answer (1-3 sentences)
  Details: evidence, code examples, config snippets
  Sources: URLs or file paths
</code></pre></div>  </div>

</details>

<details>
  <summary><strong>verifier.md</strong> — runs the check suite and reports back pass/fail</summary>

  <div class="language-markdown highlighter-rouge"><div class="highlight"><pre class="highlight"><code><span class="nn">---</span>
<span class="na">name</span><span class="pi">:</span> <span class="s">verifier</span>
<span class="na">description</span><span class="pi">:</span> <span class="s">Runs typecheck, lint, and tests. Use after implementation or as a pre-commit check.</span>
<span class="na">model</span><span class="pi">:</span> <span class="s">haiku</span>
<span class="na">tools</span><span class="pi">:</span> <span class="s">Read, Bash, Grep, Glob</span>
<span class="nn">---</span>

workflow:
  1: detect project type via config files
  2: run checks: typecheck → lint → tests
  3: return consolidated pass/fail report

rules:
  always-run-all: even if earlier checks fail
  read-only: do not fix anything
</code></pre></div>  </div>

</details>

<details>
  <summary><strong>reviewer.md</strong> — read-only code review, catches things I miss</summary>

  <div class="language-markdown highlighter-rouge"><div class="highlight"><pre class="highlight"><code><span class="nn">---</span>
<span class="na">name</span><span class="pi">:</span> <span class="s">reviewer</span>
<span class="na">description</span><span class="pi">:</span> <span class="s">Read-only code reviewer for quality, correctness, and security analysis. Use when you need a second pair of eyes on code changes, want to catch bugs before committing, or need a structured review of a module.</span>
<span class="na">model</span><span class="pi">:</span> <span class="s">sonnet</span>
<span class="na">tools</span><span class="pi">:</span> <span class="s">Read, Grep, Glob, LSP</span>
<span class="nn">---</span>

priority-order:
  1-correctness: logic errors, off-by-one, race conditions, missing edge cases
  2-security: injection, XSS, auth bypass, hardcoded secrets, unsafe deserialization
  3-performance: O(n^2)→O(n), missing indexes, N+1, memory leaks
  4-api-contracts: breaking changes, missing boundary validation, incorrect types

skip: linter-handled-style | minor-naming | missing-comments | impossible-state-handling

output-per-finding:
  [SEVERITY] file_path:line_number
  Issue: one sentence
  Why: why it matters
  Fix: concrete suggestion (code snippet if helpful)

severity: CRITICAL | HIGH | MEDIUM | LOW
summary: total by severity + verdict (ship / fix-then-ship / needs-rework)
</code></pre></div>  </div>

</details>

<details>
  <summary><strong>implementer.md</strong> — writes code in isolation and returns just the diff</summary>

  <div class="language-markdown highlighter-rouge"><div class="highlight"><pre class="highlight"><code><span class="nn">---</span>
<span class="na">name</span><span class="pi">:</span> <span class="s">implementer</span>
<span class="na">description</span><span class="pi">:</span> <span class="s">Focused code implementation agent. Works best with a precise spec.</span>
<span class="na">model</span><span class="pi">:</span> <span class="s">sonnet</span>
<span class="na">tools</span><span class="pi">:</span> <span class="s">Read, Edit, Write, Grep, Glob, Bash, LSP</span>
<span class="nn">---</span>

workflow:
  1: read target area, understand patterns and conventions
  2: minimum changes to satisfy spec
  3: match existing code style

scope: only what spec requires, no extras
output:
  Changes:
<span class="p">    -</span> file_path: what changed (1 sentence)
</code></pre></div>  </div>

</details>

<h2 id="keep-claudemd-short">Keep CLAUDE.md short</h2>

<p>Claude reads your CLAUDE.md files on every single turn. The global one, the project one, any nested ones. Every turn.</p>

<p>The shorter it is, the better your results. If you want tips on writing a good one, there’s a presentation <a href="https://github.com/ravnhq/ai-office-hours/blob/main/002/presentation.pdf">here</a>.</p>

<h2 id="claudeignore">.claudeignore</h2>

<p>Same idea as <code class="language-plaintext highlighter-rouge">.gitignore</code>. Tell Claude to skip files it doesn’t need:</p>

<div class="language-plaintext highlighter-rouge"><div class="highlight"><pre class="highlight"><code>node_modules/
dist/
*.min.js
coverage/
.next/
</code></pre></div></div>

<p>If you have large generated files, vendor directories, or build output sitting around, this keeps them out of the index.</p>

<h2 id="context-hygiene">Context hygiene</h2>

<p><strong><code class="language-plaintext highlighter-rouge">/compact</code></strong> manually triggers context compaction. I hit it when Claude starts losing the thread or when I’m about to pivot to a different subtask. You can also pass it a note about what’s coming next: <code class="language-plaintext highlighter-rouge">/compact lets focus on the login tests now</code></p>

<p><strong><code class="language-plaintext highlighter-rouge">/clear</code></strong> wipes context entirely. Between unrelated tasks, it’s almost always worth it. Dragging stale context from a finished feature into a new bug fix wastes tokens and usually makes Claude’s first attempt worse. Start clean.</p>

<h2 id="plan-before-you-build">Plan before you build</h2>

<p>I run in plan mode by default. Claude explores the codebase, proposes an approach, and waits for my go-ahead before touching anything. It catches misunderstandings before they turn into wasted edits.</p>

<h2 id="use-the-built-in-tools">Use the built-in tools</h2>

<p>Claude Code has dedicated tools (<code class="language-plaintext highlighter-rouge">Read</code>, <code class="language-plaintext highlighter-rouge">Grep</code>, <code class="language-plaintext highlighter-rouge">Glob</code>) that return structured, compact results. The bash equivalents (<code class="language-plaintext highlighter-rouge">cat</code>, <code class="language-plaintext highlighter-rouge">grep</code>, <code class="language-plaintext highlighter-rouge">find</code>) dump raw terminal output, which is noisier and eats more context.</p>

<p>Claude mostly picks the right tools on its own, but if you notice it shelling out to <code class="language-plaintext highlighter-rouge">cat</code> or <code class="language-plaintext highlighter-rouge">grep</code> regularly, add a note to your CLAUDE.md telling it to prefer the built-in tools.</p>

<hr />

<p>The payoff compounds. Longer sessions, sharper Claude, fewer moments where it forgets what you told it five minutes ago.</p>]]></content><author><name>Pedro Guimarães</name></author><summary type="html"><![CDATA[Tokens cost money, but the real tax is harder to notice. As the context window fills up, Claude gets worse — it forgets instructions, repeats itself, loses track mid-task. Here's everything I do to keep it tight.]]></summary></entry><entry><title type="html">Context Switching Done Right</title><link href="https://ravnhq.github.io/ai-toolkit/blog/context-switching-done-right/" rel="alternate" type="text/html" title="Context Switching Done Right" /><published>2026-02-20T00:00:00+00:00</published><updated>2026-02-20T00:00:00+00:00</updated><id>https://ravnhq.github.io/ai-toolkit/blog/context-switching-done-right</id><content type="html" xml:base="https://ravnhq.github.io/ai-toolkit/blog/context-switching-done-right/"><![CDATA[<p>Here’s a scenario you probably know too well.</p>

<p>You’re mid-refactor. You’ve added a couple of libraries, ripped out some old code, and half your files have red squiggly lines because you haven’t finished rewiring things yet. Then a coworker pings you. “Hey, can you check if this bug is happening on dev?” Or maybe you just hit a wall and want to work on something else for a bit.</p>

<p>So what do you do? If you’re like me, you <code class="language-plaintext highlighter-rouge">git stash</code> or throw everything into a WIP commit. Then you switch branches, run <code class="language-plaintext highlighter-rouge">npm install</code> (or <code class="language-plaintext highlighter-rouge">bun</code>, or <code class="language-plaintext highlighter-rouge">pnpm</code>, or whichever your project uses), wait for dependencies to sort themselves out, and finally get to the thing you actually wanted to do.</p>

<p>Then you go back. Was it a stash or a WIP commit? Which branch? Did you <code class="language-plaintext highlighter-rouge">stash pop</code> already or is it still in there somewhere? If you stashed, did you remember to include untracked files?</p>

<p>Do this three or four times in a week and it gets messy fast. I’ve lost work to forgotten stashes. I’ve pushed WIP commits by accident. I’ve run <code class="language-plaintext highlighter-rouge">git stash pop</code> on the wrong branch and spent precious time untangling the result.</p>

<p>It’s not a big problem. Nobody’s losing sleep over it. But it’s one of those small, constant friction points that can slowly drain your energy throughout the day.</p>

<h2 id="then-i-found-worktrees">Then I found worktrees</h2>

<p>I stumbled on <code class="language-plaintext highlighter-rouge">git worktree</code> by accident. I was reading a Medium article about something else entirely, and the author mentioned worktrees in passing. I’d never heard of them, so I looked it up.</p>

<p>The idea is simple: instead of having one working directory for your repo and switching branches inside it, you create additional working directories that each point to a different branch of the same repo. They all share the same <code class="language-plaintext highlighter-rouge">.git</code> data, so there’s no cloning involved. It’s fast, it’s lightweight, and each worktree is fully independent.</p>

<p>Here’s what it looks like in practice:</p>

<div class="language-bash highlighter-rouge"><div class="highlight"><pre class="highlight"><code><span class="c"># You're on your feature branch, mid-refactor</span>
<span class="c"># Someone asks you to check something on dev</span>

git worktree add ../my-project-dev dev
<span class="nb">cd</span> ../my-project-dev
npm <span class="nb">install</span>

<span class="c"># Do your thing, check the bug, whatever you need</span>
<span class="c"># When you're done:</span>

<span class="nb">cd</span> ../my-project
git worktree remove ../my-project-dev
</code></pre></div></div>

<p>That’s it. Your original working directory stays exactly as you left it. No stashing, no WIP commits, no trying to remember where you put things. You just open another directory.</p>

<p>You can have as many worktrees as you want. I usually keep two or three around: one for my current feature, one for <code class="language-plaintext highlighter-rouge">dev</code> or <code class="language-plaintext highlighter-rouge">main</code> so I can quickly check how things look there, and sometimes one for a hotfix or a code review.</p>

<h2 id="whats-actually-good-about-them">What’s actually good about them</h2>

<p>The obvious win is that you stop juggling stashes and WIP commits. But there are a few things I didn’t expect.</p>

<p><strong>Your node_modules stay put.</strong> Each worktree has its own <code class="language-plaintext highlighter-rouge">node_modules</code>, so you’re not reinstalling dependencies every time you switch context. The first setup takes a moment, but after that it’s instant.</p>

<p><strong>You can have different editor windows open.</strong> I keep my main feature worktree in one VS Code window and <code class="language-plaintext highlighter-rouge">dev</code> in another. Comparing behavior between branches becomes trivial. No more “let me switch branches real quick” during a call.</p>

<p><strong>It’s just directories.</strong> There’s no new mental model to learn. It’s a folder on your filesystem. <code class="language-plaintext highlighter-rouge">cd</code> into it, do your work, <code class="language-plaintext highlighter-rouge">cd</code> out. Your tools, your editor, your terminal, everything works exactly the same.</p>

<h2 id="the-pitfalls">The pitfalls</h2>

<p>Worktrees aren’t perfect. A few things to watch out for.</p>

<p><strong>You can’t check out the same branch in two worktrees.</strong> Git locks a branch to one worktree at a time. This makes sense (two worktrees writing to the same branch would be chaos), but it can be surprising the first time you hit it. If you need to look at code on a branch that’s already checked out elsewhere, you can create a temporary branch or use <code class="language-plaintext highlighter-rouge">git worktree add --detach</code>.</p>

<p><strong>Each worktree needs its own dependency install.</strong> That first <code class="language-plaintext highlighter-rouge">npm install</code> per worktree is unavoidable. If your project has heavy dependencies, this can eat some disk space. I haven’t found it to be a problem in practice, but it’s worth knowing.</p>

<p><strong>They can pile up.</strong> If you forget to clean up old worktrees, you’ll end up with a bunch of stale directories. <code class="language-plaintext highlighter-rouge">git worktree list</code> shows you what’s active, and <code class="language-plaintext highlighter-rouge">git worktree prune</code> cleans up references to deleted directories. I run these occasionally to keep things tidy.</p>

<p><strong>Gitignored files don’t come along.</strong> Worktrees only contain tracked files. Your <code class="language-plaintext highlighter-rouge">.env</code>, local config files, anything in <code class="language-plaintext highlighter-rouge">.gitignore</code> won’t be there. You’ll need to copy those over manually. It’s easy to forget this, spin up a worktree, run the project, and wonder why nothing works until you realize there’s no <code class="language-plaintext highlighter-rouge">.env</code>.</p>

<p><strong>Some tools get confused.</strong> Most editors handle worktrees fine since they’re just regular directories. But I’ve seen the occasional git GUI get confused about which worktree it’s looking at. If you live in the terminal for git operations, you won’t notice this.</p>

<h2 id="where-it-really-clicked-claude-code">Where it really clicked: Claude Code</h2>

<p>Here’s where things got interesting for me.</p>

<p>I’ve been using Claude Code for a while now. It works directly in your project directory, reading files, running commands, making changes. The problem is, if Claude is working on something in your project directory and you also want to work there, you’re going to collide. Maybe it’s modifying a file you’re also editing. Maybe it’s running tests while you’re in the middle of changing something that’ll break them.</p>

<p>Worktrees solve this completely.</p>

<p>I can spin up a worktree for Claude to audit the codebase while I keep developing in the main directory. Or I can have Claude writing tests in one worktree while I’m implementing a feature in another. Claude Code even has a built-in <code class="language-plaintext highlighter-rouge">-w</code> flag that creates a worktree for you automatically (<code class="language-plaintext highlighter-rouge">claude -w feature-name</code>), gives it its own branch, and cleans up after itself when you’re done.</p>

<p>The real unlock is running multiple Claude instances at once. One worktree has Claude running through test coverage. Another has it doing a code review. And I’m coding in my main directory without any of us stepping on each other’s toes. Three parallel workstreams from one repo, no conflicts, no coordination needed.</p>

<p>But it goes beyond just avoiding collisions. Worktrees make longer, more ambitious Claude workflows practical. If you’ve ever had Claude working on a big refactor or writing a whole test suite, you know it can take a while. Without worktrees, you’re basically locked out of your project until it finishes. You sit there watching, or you interrupt it, or you context-switch away (and we’re back to the stash/WIP problem). With worktrees, you just let Claude keep going in its own directory. You don’t need to watch it. You don’t need to wait. You open your main worktree and keep working on whatever you want. When Claude’s done, the changes are sitting in its worktree branch, ready for you to review and merge on your own time.</p>

<p>This also changes how you think about delegating work to Claude. Instead of giving it small, quick tasks because you need your project back, you can hand it something bigger. “Go through this module and add missing error handling.” “Write integration tests for the API layer.” Things that would take thirty minutes or more. You’re not blocked, so the task size stops mattering as much.</p>

<p>Before worktrees, my workflow for any of this wasn’t practical. I’d need separate clones, which means separate git histories to manage, separate remotes to configure, separate everything. Or I’d have to constantly switch branches, reinstall dependencies, and keep track of what state everything was in. Even without Claude Code, that was hard to manage. With it, it was impossible.</p>

<h2 id="should-you-bother">Should you bother?</h2>

<p>If you’re someone who rarely switches context, probably not. Worktrees solve a specific problem, and if you don’t have that problem, they’ll just be one more thing to know about.</p>

<p>But if you find yourself stashing and un-stashing multiple times a day, or if you’re juggling WIP commits across branches, or if you’re running AI coding tools alongside your own work: give worktrees a try. The learning curve is about fifteen minutes and the payoff is immediate.</p>

<p>My stash list has never been this clean. Seriously, just try it.</p>]]></content><author><name>Afonso Ferrer</name></author><summary type="html"><![CDATA[Stashes, WIP commits, branch juggling. There's a better way to handle context switching, and it pairs surprisingly well with AI coding tools.]]></summary></entry><entry><title type="html">Making Claude Code Yours</title><link href="https://ravnhq.github.io/ai-toolkit/blog/making-claude-code-yours/" rel="alternate" type="text/html" title="Making Claude Code Yours" /><published>2026-02-11T00:00:00+00:00</published><updated>2026-02-11T00:00:00+00:00</updated><id>https://ravnhq.github.io/ai-toolkit/blog/making-claude-code-yours</id><content type="html" xml:base="https://ravnhq.github.io/ai-toolkit/blog/making-claude-code-yours/"><![CDATA[<p>Most people install Claude Code and start using it as-is. That’s fine — it works well out of the box. But there’s a whole layer of personalization that most people never touch, and it makes a real difference in how the tool feels day to day. Here’s what you can change.</p>

<p><strong>1. The status line.</strong> That bar at the bottom of your terminal? It’s fully customizable. You can make it show your current model, git branch, context window usage, session cost, lines added/removed — whatever matters to you. The fastest way to set it up is with the <code class="language-plaintext highlighter-rouge">/statusline</code> command. Run it without arguments to see the default, or describe what you want:</p>
<div class="language-plaintext highlighter-rouge"><div class="highlight"><pre class="highlight"><code>/statusline show model name, git branch, and context percentage
</code></pre></div></div>

<p>Claude generates a shell script and wires it into your settings automatically. If you want full control, point it at your own script in <code class="language-plaintext highlighter-rouge">settings.json</code>:</p>

<div class="language-json highlighter-rouge"><div class="highlight"><pre class="highlight"><code><span class="p">{</span><span class="w">
  </span><span class="nl">"statusLine"</span><span class="p">:</span><span class="w"> </span><span class="p">{</span><span class="w">
    </span><span class="nl">"type"</span><span class="p">:</span><span class="w"> </span><span class="s2">"command"</span><span class="p">,</span><span class="w">
    </span><span class="nl">"command"</span><span class="p">:</span><span class="w"> </span><span class="s2">"~/.claude/statusline.sh"</span><span class="w">
  </span><span class="p">}</span><span class="w">
</span><span class="p">}</span><span class="w">
</span></code></pre></div></div>

<p>Here’s <a href="https://gist.github.com/0x7067/dde056c2ee56353a4c889a4ab3d111e2">mine</a>:</p>

<p><img src="/ai-toolkit/assets/images/posts/statusline.png" alt="Custom statusline showing model, project, branch, context usage, and file changes" /></p>

<p>If you want something more complex, you can check projects such as <a href="https://github.com/Haleclipse/CCometixLine">CCometixLine</a> and <a href="https://github.com/sirmalloc/ccstatusline">ccstatusline</a>.</p>

<p><strong>2. Spinner verbs.</strong> While Claude is working, you see little verbs cycling in the terminal — “Thinking”, “Working”, and so on. You can replace them. Add this to your <code class="language-plaintext highlighter-rouge">settings.json</code>:</p>

<div class="language-json highlighter-rouge"><div class="highlight"><pre class="highlight"><code><span class="p">{</span><span class="w">
  </span><span class="nl">"spinnerVerbs"</span><span class="p">:</span><span class="w"> </span><span class="p">{</span><span class="w">
    </span><span class="nl">"mode"</span><span class="p">:</span><span class="w"> </span><span class="s2">"replace"</span><span class="p">,</span><span class="w">
    </span><span class="nl">"verbs"</span><span class="p">:</span><span class="w"> </span><span class="p">[</span><span class="s2">"Pondering"</span><span class="p">,</span><span class="w"> </span><span class="s2">"Brewing"</span><span class="p">,</span><span class="w"> </span><span class="s2">"Conjuring"</span><span class="p">,</span><span class="w"> </span><span class="s2">"Manifesting"</span><span class="p">]</span><span class="w">
  </span><span class="p">}</span><span class="w">
</span><span class="p">}</span><span class="w">
</span></code></pre></div></div>

<p>Use <code class="language-plaintext highlighter-rouge">"mode": "append"</code> to add yours to the defaults, or <code class="language-plaintext highlighter-rouge">"replace"</code> to use only yours. Give it a personal touch by adding your own verbs.</p>

<p>Example prompt: “I want my spinner verbs to be Star Wars related”</p>

<p><strong>3. Language.</strong> One line in <code class="language-plaintext highlighter-rouge">settings.json</code>:</p>

<div class="language-json highlighter-rouge"><div class="highlight"><pre class="highlight"><code><span class="p">{</span><span class="w">
  </span><span class="nl">"language"</span><span class="p">:</span><span class="w"> </span><span class="s2">"spanish"</span><span class="w">
</span><span class="p">}</span><span class="w">
</span></code></pre></div></div>

<p>Claude responds in that language. That’s it. Works with any language — Japanese, Portuguese, French, whatever you think in.</p>

<p><strong>4. Output style.</strong> This controls how Claude structures its responses. Run <code class="language-plaintext highlighter-rouge">/output-style</code> to pick from the built-ins: <strong>Default</strong> (standard engineering assistant), <strong>Explanatory</strong> (adds educational insights between tasks), and <strong>Learning</strong> (collaborative mode with <code class="language-plaintext highlighter-rouge">TODO(human)</code> markers for you to implement yourself).</p>

<p>You can also have custom styles. Drop a markdown file in <code class="language-plaintext highlighter-rouge">~/.claude/output-styles/</code> and it shows up in the picker:</p>

<div class="language-markdown highlighter-rouge"><div class="highlight"><pre class="highlight"><code><span class="nn">---</span>
<span class="na">name</span><span class="pi">:</span> <span class="s">No yapping</span>
<span class="na">description</span><span class="pi">:</span> <span class="s">Minimal output, no fluff</span>
<span class="na">keep-coding-instructions</span><span class="pi">:</span> <span class="no">true</span>
<span class="nn">---</span>

Sacrifice grammar for the sake of conciseness. No preambles, no summaries, no "let me help you with that".
</code></pre></div></div>

<p><strong>5. Ctrl+G to edit in your editor.</strong> When your prompt is getting long or you want to think more carefully about what you’re asking, press <code class="language-plaintext highlighter-rouge">Ctrl+G</code>. It opens your current input in your <code class="language-plaintext highlighter-rouge">$EDITOR</code> — Vim, VS Code, whatever you have set. Write your prompt there, save and close, and it lands back in the chat input. It’s pretty useful for saving a prompt or editing a long prompt in a more comfortable environment.</p>

<p><strong>6. Notifications.</strong> When Claude finishes a long task, you probably want to know about it without staring at the terminal. If you’re on iTerm2, enable alerts under Preferences → Profiles → Terminal. It works with Ghostty also. For something more custom, you can set up a notification hook that runs any shell command when Claude needs your attention — a macOS alert, a sound, a Slack ping, whatever fits your workflow.</p>

<p>You can also set <code class="language-plaintext highlighter-rouge">"showTurnDuration": true</code> in settings to see how long each response took — useful for staying aware of cost and complexity.</p>

<p><strong>7. CLAUDE.md and rules files.</strong> This is the deepest form of personalization. While the other items change how Claude looks and feels, this one changes how it thinks.</p>

<p><code class="language-plaintext highlighter-rouge">CLAUDE.md</code> is a markdown file that Claude reads at the start of every session. You can place it in different locations depending on scope:</p>

<ul>
  <li><code class="language-plaintext highlighter-rouge">~/.claude/CLAUDE.md</code> — your global preferences, applied to every project</li>
  <li><code class="language-plaintext highlighter-rouge">./CLAUDE.md</code> or <code class="language-plaintext highlighter-rouge">.claude/CLAUDE.md</code> — project-level instructions, shared with your team via git</li>
  <li><code class="language-plaintext highlighter-rouge">./CLAUDE.local.md</code> — project-level but personal, not committed</li>
</ul>

<p>For anything beyond a handful of rules, use the <code class="language-plaintext highlighter-rouge">rules/</code> directory instead. Create focused files by concern:</p>

<div class="language-plaintext highlighter-rouge"><div class="highlight"><pre class="highlight"><code>~/.claude/rules/
├── coding-style.md
├── git-workflow.md
├── security.md
└── testing.md
</code></pre></div></div>

<p>Claude loads them all automatically. You can also scope rules to specific file paths using frontmatter:</p>

<div class="language-markdown highlighter-rouge"><div class="highlight"><pre class="highlight"><code><span class="nn">---</span>
<span class="na">paths</span><span class="pi">:</span>
  <span class="pi">-</span> <span class="s2">"</span><span class="s">src/api/**/*.ts"</span>
<span class="nn">---</span>

<span class="gh"># API Rules</span>
<span class="p">-</span> All endpoints must validate input with Zod
<span class="p">-</span> Return consistent error shapes
</code></pre></div></div>

<p>Rules without <code class="language-plaintext highlighter-rouge">paths</code> apply everywhere. Rules with <code class="language-plaintext highlighter-rouge">paths</code> only activate when Claude is working on matching files.</p>

<p>Between global CLAUDE.md, project CLAUDE.md, rules files, and local overrides, you can build a layered system where Claude understands your coding standards, your team’s conventions, and your personal preferences.</p>

<hr />

<p>None of this takes long to set up, and most of it you only do once. Start with a small thing that either annoys you or will bring you joy.</p>

<p>As always, you can ask Claude to help you out if you need it.</p>]]></content><author><name>Pedro Guimarães</name></author><summary type="html"><![CDATA[Claude Code is surprisingly personal. Here are 7 ways to make it feel like your own — from what it says while thinking to how it writes code.]]></summary></entry><entry><title type="html">Top 10 Claude Code Tips for Newcomers</title><link href="https://ravnhq.github.io/ai-toolkit/blog/top-10-claude-code-tips/" rel="alternate" type="text/html" title="Top 10 Claude Code Tips for Newcomers" /><published>2026-02-09T00:00:00+00:00</published><updated>2026-02-09T00:00:00+00:00</updated><id>https://ravnhq.github.io/ai-toolkit/blog/top-10-claude-code-tips</id><content type="html" xml:base="https://ravnhq.github.io/ai-toolkit/blog/top-10-claude-code-tips/"><![CDATA[<p><strong>1. Set up CLAUDE.md files to shape Claude’s behavior.</strong> Drop a <code class="language-plaintext highlighter-rouge">CLAUDE.md</code> in <code class="language-plaintext highlighter-rouge">~/.claude/</code> for global instructions or in any project root for project-specific ones. This is the single most impactful thing you can do — it turns Claude from a generic assistant into one that follows your coding standards, patterns, and preferences every single session.</p>

<p><strong>2. Use the <code class="language-plaintext highlighter-rouge">~/.claude/rules/</code> directory to organize instructions by concern.</strong> Instead of cramming everything into one file, split rules into focused files like <code class="language-plaintext highlighter-rouge">coding-style.md</code>, <code class="language-plaintext highlighter-rouge">security.md</code>, and <code class="language-plaintext highlighter-rouge">testing.md</code>. Claude loads them all automatically, and you can scope project-level rules to specific file paths using YAML frontmatter.</p>

<p><strong>3. Install skills to give Claude specialized knowledge.</strong> Skills are reusable prompt packs you invoke with slash commands (like <code class="language-plaintext highlighter-rouge">/promptify</code> or <code class="language-plaintext highlighter-rouge">/commit</code>). Discover and install community skills from GitHub repos using <code class="language-plaintext highlighter-rouge">/find-skills</code> (from <a href="https://github.com/vercel-labs/skills">vercel-labs/skills</a>), or create your own with <code class="language-plaintext highlighter-rouge">/agent-skill-creator</code>. Popular sources include <a href="https://github.com/callstackincubator/agent-skills">callstackincubator</a>, <a href="https://github.com/intellectronica/agent-skills">intellectronica</a>, and <a href="https://github.com/vercel-labs/agent-skills">vercel-labs</a>. Here at Ravn, we maintain our own shared skills — like <code class="language-plaintext highlighter-rouge">core-coding-standards</code>, <code class="language-plaintext highlighter-rouge">lang-typescript</code>, and <code class="language-plaintext highlighter-rouge">agent-skill-creator</code> — in our <a href="https://github.com/ravnhq/ai-toolkit">ai-toolkit repo</a>.</p>

<p><strong>4. Configure hooks to enforce guardrails automatically.</strong> Hooks are shell scripts that run before/after tool calls or on stop events. Use them to block unsafe patterns (like secret leaks in commits), sync with external tools, or trigger notifications — all without manual intervention.</p>

<p><strong>5. Lock down permissions with denied paths and allowed commands.</strong> In your settings, explicitly deny access to sensitive paths (<code class="language-plaintext highlighter-rouge">.env</code>, <code class="language-plaintext highlighter-rouge">~/.ssh/</code>, <code class="language-plaintext highlighter-rouge">~/.aws/</code>) and whitelist only the bash commands you need. This lets you grant Claude more autonomy on safe operations while keeping secrets untouchable.</p>

<p><strong>6. Add MCP servers for extended capabilities.</strong> MCP servers give Claude access to web search, documentation lookup, and other tools that run as background services. Start with <code class="language-plaintext highlighter-rouge">context7</code> for library docs and a web search server — they pay for themselves the first time Claude needs to check current API syntax.</p>

<p><strong>7. Learn the slash commands that save you time.</strong> Claude Code has built-in commands that keep you in flow: <code class="language-plaintext highlighter-rouge">/compact</code> summarizes and shrinks your context when it gets long, <code class="language-plaintext highlighter-rouge">/clear</code> starts fresh, <code class="language-plaintext highlighter-rouge">/model</code> switches between Opus, Sonnet, and Haiku mid-session, and <code class="language-plaintext highlighter-rouge">/cost</code> shows you what you’ve spent. Skill-based commands like <code class="language-plaintext highlighter-rouge">/commit</code> and <code class="language-plaintext highlighter-rouge">/review-pr</code> turn multi-step workflows into a single invocation.</p>

<p><strong>8. Use Plan Mode for non-trivial tasks.</strong> Before jumping into code, type your request and let Claude explore the codebase and propose a plan first. Review and approve it before any edits happen. This prevents wasted work and misaligned implementations, especially on multi-file changes.</p>

<p><strong>9. Customize your status line and spinner for better awareness.</strong> A custom status line showing your model, git branch, and context window usage helps you stay oriented during long sessions. And yes, you can replace the default spinner verbs with whatever brings you joy.</p>

<p><strong>10. Build your <code class="language-plaintext highlighter-rouge">memory/</code> directory over time.</strong> Claude has persistent memory at <code class="language-plaintext highlighter-rouge">~/.claude/projects/&lt;project&gt;/memory/</code>. As you work, it records patterns, mistakes, and project-specific knowledge that carries over between sessions. The more you use it, the less you repeat yourself.</p>

<hr />

<p>Got a skill idea, a useful CLAUDE.md rule, or a hook that saved you time? Contribute it to our shared repo at <a href="https://github.com/ravnhq/ai-toolkit">github.com/ravnhq/ai-toolkit</a>. Any contribution is welcome — whether it’s a full skill, a bug fix, or just a better prompt. The more we share, the better Claude works for all of us.</p>

<p><strong>P.S.</strong> You don’t have to set all of this up by hand — Claude itself can help. Ask it to create a CLAUDE.md, write a hook, scaffold a skill, or configure your rules directory. Most of the tips above are one prompt away.</p>]]></content><author><name>Pedro Guimarães</name></author><summary type="html"><![CDATA[The most impactful things you can do to turn Claude from a generic assistant into one that follows your coding standards, patterns, and preferences every single session.]]></summary></entry></feed>